In certain states in India, the driving license (DL) renewal process can be contactless. This means, you don't have to go to the road transport office (RTO) at all. You can do the entire process online, and the DL will be delivered to your house. Also, if you use Aadhaar authentication, you don't even have to upload your photo. It'll automatically be fetched from the Aadhaar server.
Disclaimer: What is presented here is in no way an official communication of the Road Transport Office (RTO). These are bits of information I’m presenting from my (non-transport category vehicle) experience of renewing my driving license (DL), so that it may provide some clarity and overview to people who wish to renew their DL. The time taken would vary for you. I’ve tried to present accurate information to the best of my knowledge, but there might be inaccuracies, and the procedures, web pages, etc. may change with time, so kindly contact your RTO to obtain the latest information that is relevant to you.
How many months prior to DL expiry can you initiate renewal?
The driving license renewal can be done one year prior to driving license (DL) expiry. I got an email confirmation about this from the helpdesk. Earlier it was possible to renew it only one month prior. Just remember that if the renewal is done too early, you'll lose some validity period. For example, if your DL expires in August, and you renew the DL in January, the newly renewed DL will have the January date on it, so the next time you need to renew it, you'll have to do it on or before January. I hope they change the process later, to not let there be such a loss of validity period.
Is a medical certificate required if you aren't yet 40 years old?
If problems happen during the application process, whom to contact?
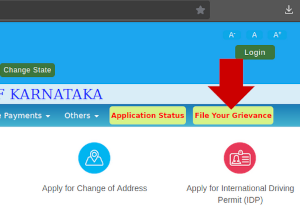
- The first option is to file a grievance from the homepage (the button for filing a grievance is shown in one of the screenshots below).
- The second option is to send an email to helpdesk-sarathi@gov.in (or whatever the current contact email id is shown on the Parivahan website) with details about the problem and your application number. They generally reply within a few days, but once it took eleven days.
- The third option is to find out your RTO's phone number or email id, and ask them. During the application process, I remember seeing the email id of my RTO.
- In extreme situations, you could consider PG Portal or Lok Adalat, but it may not be necessary, since delays might simply be a matter of the people at the RTO not having sufficient manpower to process requests. You need to have some patience and use the RTO's contact points as much as possible first.
Timeline
 |
| Click the image to view it larger |
Procedure
 |
| Getting to the state-specific page |
Close the popup which shows you which services are contactless.

 |
| Homepage |
Remember: Once you've started the application process, you can close the browser anytime, and return back later to continue applying. But to continue applying, you need to click the "Application Status" button (shown above, with the yellow arrow pointing to it) to continue with the same application.
 |
| Availability of form 1A (medical certification of fitness) |
 |
| Application start |
 |
| Initial confirmation and RTO selection |
Now you'll be allowed to confirm your address. There's no need of entering the Qualification and Employer category, but you may be asked to mention the Taluka.
 |
| Address confirmation |
 |
| Aadhaar eKYC. Click image to view larger. |
 |
| Service choice. Click image to view larger. |
 |
| Choice for Form1. Click image to view larger. |
The self declaration. Rule 5[2] might be a rule mentioned in the motor vehicles act.
 |
| Self declaration form. Click image to view larger. |
Application number now available
On submission, you'll be given an application reference slip which you can download as a PDF. It clearly mentions that there's no need of going to the RTO. Make sure you note the Application number mentioned on the slip.
 |
| Application reference. Click image to view larger. |
The application process is not yet complete. Now if you are not automatically taken to the Application Status page, you can to go to the homepage and click the "Application status" button to start uploading your documents.
 |
| How to access the application anytime |
Enter your application number, date of birth and captcha. Click Proceed.
 |
| Continuing the application using the application number |
The remaining steps are shown, and notice how the photo upload is exempt (not required) because it was automatically taken from the Aadhaar database. Click "Proceed to upload documents".
 |
| Steps remaining |
 |
| Photo and signature exempt |
On clicking Ok, you will be allowed to upload the documents. I only had to upload a self-signed DL copy. Mentioning the document number was not required because it didn’t allow me to enter the full DL number. For “Issued by”, I typed “RTO”. Click “Browse” to upload the document. If you have more documents to upload, you can select the respective options from the "Documents" dropdown menu in the "Required Documents" section and upload them. Once all documents are uploaded, click "Next".
 |
| Document upload page |
This is the document I uploaded, from what I understood from videos online. You could ask your RTO about what format they need this document to be in.
 |
| Uploaded document for DL |
Payment process
Proceed for fee payment.

View the total fee and proceed to pay. The Gateway available for me was named “Khajana 2”.
 |
| Fees to pay. Click image to view larger. |
Note your token/transaction number and proceed to pay.

Here I encountered an error: "Not able to process the request. Reason: Sorry we are unable to redirect to bank login". I could not proceed even when I went back to the homepage and attempted the payment again. I was shown errors like “404. Oops! The page you are looking for can’t be found”, and “Sorry..! We are unable to process your request now. Please try after sometime”. Even trying the next day didn’t help.

So I went to the homepage and filed a grievance. Only a limited number of words can be typed in the “Feedback” field of the form, so if you need to attach screenshots or explain more, you can use the “Browse” option to attach a file with more information. Sometimes, attaching a file results in an error on submission, so if that happens, just mention the issue briefly in the feedback field, and submit it. In most cases, they look into the matter immediately. If there’s a long delay and nothing happens, you can send an email to helpdesk. You can see if there's any response to the grievance you filed, by clicking on the "File your grievance" button again. At the bottom of the page it'll show you all the grievances you filed.
 |
| Filing a grievance |
They fixed the backend issues with the payment, and I could proceed to pay. I don't know within how many days they fixed it. I didn't get any notification, so I checked only around a week later. After payment, you’ll be shown the payment receipt number and an option to print it or get a PDF version of it.

Viewing the remaining status updates
Now you can go back to the homepage by clicking the "Home" button, and select the "Application status" button again, to see the status of the application anytime. Ideally, there’s nothing more you need to do. The scrutiny and endorsement will be done and the DL will be printed and sent to your house by speed post.

In my case, the application remained stuck at the scrutiny stage for around 18 days, and it moved forward only when I realized that nobody is attending to it, and submitted a grievance.
Soon the scrutiny was done, and I received an SMS containing a Sakala number. The endorsement was done soon after (at this stage you can see the renewed DL on DigiLocker, which I believe can be used as a valid DL), and the DL was printed. I've heard that many DL's may be sent as a batch for printing, which may be one reason the printing takes a long time to happen. The same might be true for sending DL's to the post office.
Then I received an SMS that the DL has been dispatched. The SMS also had an India Post tracking ID. However, when I went to the India Post website and entered the Consignment tracking number, it showed an error that the consignment details were not found.
I emailed India Post's Bangalore branch, and they replied that they did not physically receive the DL. This meant that the DL was still in the RTO. So I filed another grievance that the DL was not dispatched. Nobody seemed to have attended to this grievance, so I emailed the helpdesk about this, and then the DL was sent to the post office and it was delivered to my house.
Phew! That's it. It took a good amount of effort to create this guide. Hope this has helped you, and wishing you all the best for your application.
For RC renewal I had created another guide here.
